Super Sam World - Episode 0: Race to the BarCamp
It's the simplest platformer implementation I could imagine - there's just one level with one-way platforms, a start and an exit. This was deliberate, both to make things easier for myself and to make the code simpler for anyone wanting to have a play around with it. I couldn't create something for a STEM event without releasing the code as open-source, now could I? Interestingly I found that the limited game logic made for a fun constraint to design within.
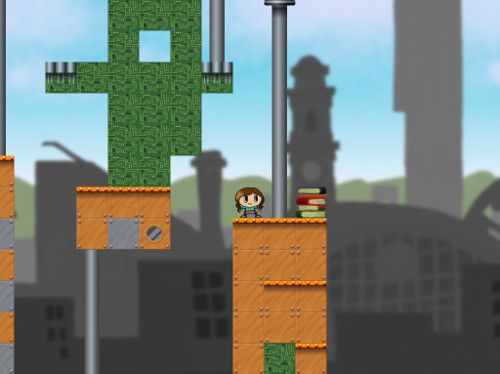
Screenshot from the game
One hurdle that I ran up against was with the tile rendering. The level foreground is drawn using lots of repeating square graphics called tiles - a technique that 8- and 16-bit-era games used to employ to make best use of the limited video memory available at the time. Even though they were born out of hardware limitations, a lot of modern 2D games still use tiles both for the retro aesthetic and for the ease of level design this modular approach brings.
Originally I was rendering the tiles by looping over each tile visible on the screen, and using PyGame's Surface.blit to copy the appropriate graphic to the screen buffer, each frame. The problem I found with this was that it was simply too slow to draw enough 64x64 pixel tiles to cover a 1024x768 screen.
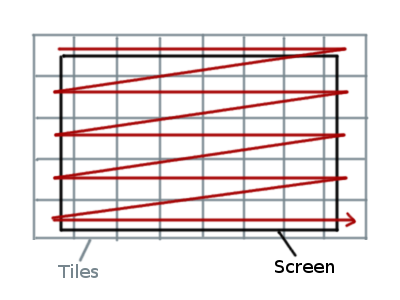
Naive tile rendering
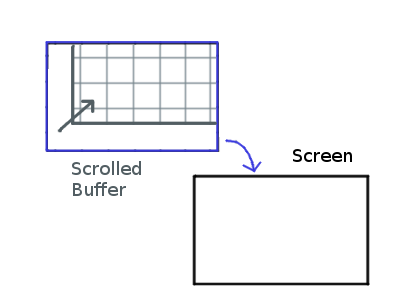
As an optimisation, I did the following. Firstly I changed the tile rendering to render to a second Surface instead of directly to the screen Surface. This meant I had a "clean" version of the rendered tiles even after the other screen elements (background, player, text) had been drawn each frame.
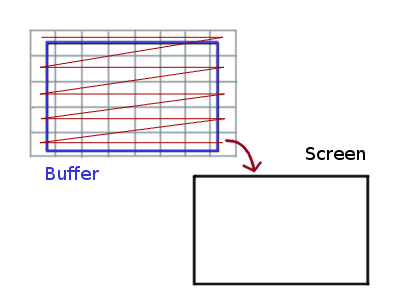
Rendering to a buffer
Next I had the tile rendering start with the buffered tiles from the previous frame, and shift the image in the buffer according to how far the screen had moved across the level. PyGame's Surface.scroll can be used to shift a Surface in place. By using the tiles from the previous frame, this meant that as long as the screen didn't scroll too much between frames, most of the tiles would already be drawn for the next frame.
Scrolling rendered tiles from previous frame
Finally I only needed to blit the tiles required to fill in the gaps left by the shifted buffer. I looped over the screen tiles as before, but skipped out the ones that were completely covered by pre-rendered area. The completed tile buffer could then be used as a starting point for the next frame, and so on.
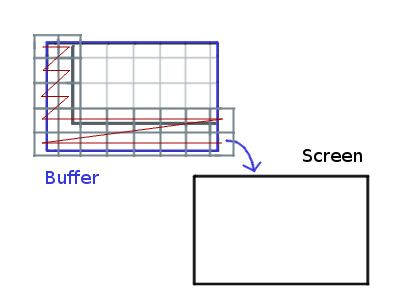
Rendering tiles to fill in the gaps
The finished game can be found on the GitHub page here:
]]>Mipmaps
First, for the uninitiated (or if, like me, you regularly need a reminder about what all the various 3D-graphics terms mean), I'll cover what mip-maps are and why they're used.
A computer graphic consists of a 2-dimensional array of pixels, and so does the screen that you view it on. If we want to display a graphic at its original size, the pixels of the graphic are simply copied to the pixels of the screen and no information from the graphic is lost.
Rendering without scaling
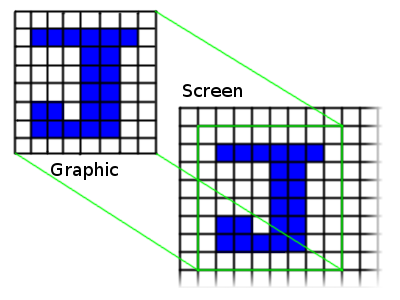
However, if we want to display a graphic at a smaller size to the original, we have to scale down the graphic. A naive approach to this would be, for each pixel in the target area of the screen, to look up the pixel at the same location, proportionally, in the graphic. As we look up each pixel to draw on the screen, we skip out pixels in-between in the graphic.
Scaled down by skipping pixels
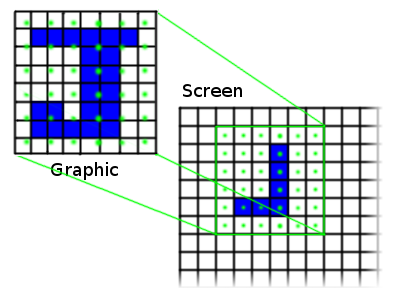
A better approach is to use bilinear interpolation to calculate the colour values between pixels in the source graphic. For example, if our scale lookup lands 3/4 of of the way between a blue pixel and a white pixel, we draw a pixel on the screen which mixes 3/4 white and 1/4 blue, giving us a light blue colour. The result is a smoother-looking scaled image.

Scaled down using bilinear interpolation
Smooth scaling is important when rendering textured surfaces in 3D. A surface which disappears into the screen, such as a wall or floor, shows the effect of the chosen scaling approach very obviously in the distance. Using the naive pixel-skipping approach, the texture quickly becomes a mess of undecipherable pixels and we begin to see moire patterns at the furthest points.
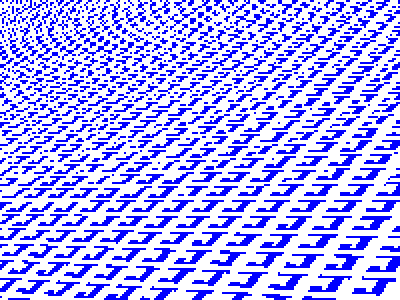
Scaling on a 3D surface
By contrast, interpolated scaling gives a much better result. The overall shape of the texture can still be made out in the distance, even if the details can not, and the dizzying moire patterns are gone.
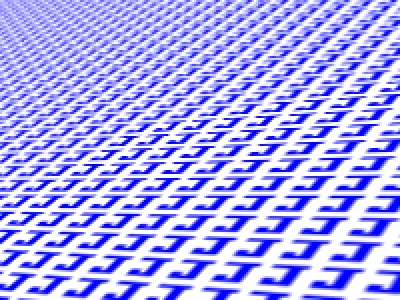
Scaling on a 3D surface with interpolation
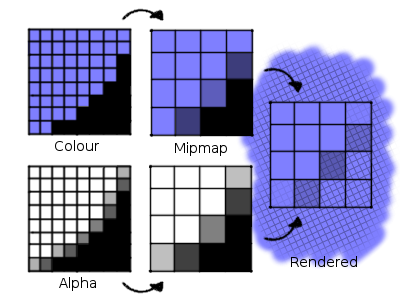
The problem with scaling like this is that it is a much more costly operation to perform in real-time. This is where mipmaps come in. Mipmaps are collections of pre-scaled textures. Rather than performing the slow, interpolated scaling every time a texture is rendered, we create several copies of the texture once, smooth-scaled to various sizes, and use these to look up the pixels to render each time. The texture size that we read from is based upon the scale that we're rendering.

Scaled down using mipmaps
Stretching and Un-Stretching
So, back to my 2D sprites. I had generated mipmaps for all my sprite textures, because why not? However, I soon ran into my first caveat.
I had a rectangular sprite which, when converting to a texture, I had stretched to be square (a requirement of textures). I had assumed I could just render a rectangular triangle pair with the square texture on it, and this would result in the sprite having the correct aspect ratio. It did have the correct aspect ratio, but it looked terrible. The visual quality of the image was awful; it was far too blurry to make out any of the fine detail.
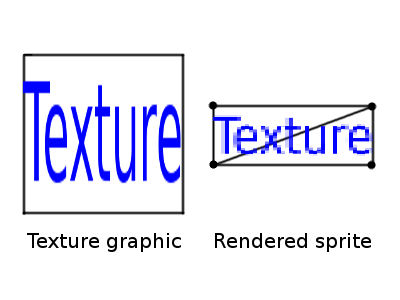
Low-quality image when squashing the texture back to its original height
The reason was down to the mipmaps. Because the texture was being squashed, even just on one axis, OpenGL's mipmapping was kicking in. It was helpfully trying to smooth out the result by switching to a pre-smoothed version of the image. The result was a loss of visual fidelity on both axes.
Stretching the texture was a bad idea. Instead, expanding the empty space around the sprite to make a square texture was a much more sensible alternative and avoided the need for unnecessary scaling. An even better idea would be for me to use a texture atlas anyway, but I've yet to implement that.
Colour Bleed
The second mipmap-related caveat I hit was an ugly darkened border that I noticed around my sprites. This was particularly noticeable where the edge of one sprite overlayed another of the same colour, where there should have been no visible transition between them. At first I thought this might have been related to pre-multiplied alpha, but this turned out to not be the case. The reason actually turned out to be to do with the way the sprite images were saved from my paint application.
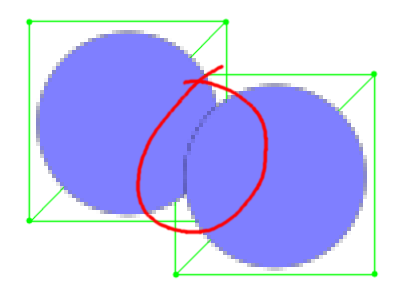
Noticeable darkened border when same colour overlaps
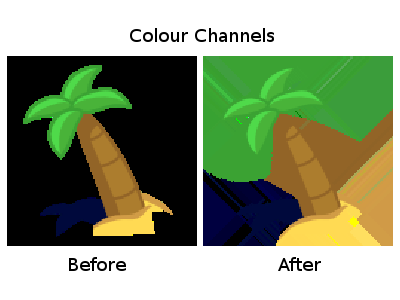
When OpenGL creates mipmaps, it does so by taking the average colour values over multiple adjacent pixels. This was fine for the opaque parts of the sprite, where colours simply mixed with other colours. But at the edge of the sprite, the alpha channel got involved. What happens, you might wonder, when semi-transparent coloured pixels are averaged with fully-transparent pixels? The result would be more transparent but not quite fully-transparent, but what about the colour?
The answer is that the average uses whatever colour value those fully-transparent pixels happen to have in their red, green and blue channels. You can't usually see this colour value, because it's completely see-through, but there is a colour stored there. The graphics application I'm using, GIMP, happens to use black (zero red, green and blue) for those pixels when it exports an image, and so averaging the sprite's edge pixels with black was resulting in visibly darker colours around the edge.
Black in transparent pixels darkening colours in mipmap
A solution to this issue is to explicitly define the colour values of the transparent pixels so that they don't default to black. In GIMP, I had some degree of success using the following technique:
- With layers collapsed, right click on the image's remaining layer and select "Add Layer Mask"
- From the list of options, choose "Layer's Alpha Channel"
- Right click on the layer mask in the layer view and choose "Disable Layer Mask" so that we can see the image without alpha applied
- Left click on the layer in the layer view to reselect it
- Select the magic wand tool and select the empty region around the sprite
- From the menu, choose "Select" > "Grow" to include a bit of the sprite's edge in the selection
- From the menu, choose "Filter" > "Distorts" > "Value Propagate".
- Select the "More opaque" radio button and click OK
- Continue to repeat the filter with Ctl+F until the edge of the sprite has bled out to the edges of the image
- Right click on the layer in the layer view and choose "Remove Alpha Channel"
- Right click on the layer mask in the layer view and re-enable the layer mask to see the image with alpha applied. The sprite should look unchanged from its original state, but now has appropriate colour values in the transparent pixels
- Export the image as normal
Bleeding out colours using Value Propagate
I found that the Value Propagate filter wasn't entirely reliable, so I had to do some value propagation by hand to prevent corrupting the sprite itself.
Do I Even Need Mipmaps?
At this point, I've concluded that I can probably manage without mipmaps at all, at least for the time being. The hoops I'm having to jump through by processing each of my sprite graphics, for the sake of nicer scaling, doesn't seem like such a great trade-off. I've put that feature on the low-priority, "nice-to-have" pile, for now.
]]>We had a bunch of themes to work with for inspiration, and these were climbing, inversion, robots, stealing and hats. Immediately my brain went straight to the gentlemanly insult of having one's hat stolen straight off one's head. I'd brought a couple of XBox controllers with me, so I'd already decided that I was making a local multiplayer game. I also had a vague idea that having the characters' arms stretch out would be kind of funny, so I started to throw something together.
Several hours later I had a couple of character sprites running around a tile map, extending out their long, unnecessarily creepy arms like something from Monty Python. I, for one, was giggling like a schoolgirl at this. With about 90 minutes 'til deadline, OddballDave pulled another pair of XBox controllers and a USB hub from his bag, and said I had no excuse not to make it support 4 players. I hacked in 4-player support at the last minute, and the result was pretty sweet for a day's work.
In the month since then I've spent a few hours here and there ironing out some of the creases, improving the sounds and controls, and adding luxuries that a jam deadline simply doesn't allow for, such as a title screen. So here it is, a little 4-player local multiplayer game called "Hear! Hear! Sneaking Hat Get".
Plug in some gamepads, grab some friends / people off the street / the cat, download it and have fun. I'd love to hear your feedback!
- Windows: hatget-1-1-win.zip
- Linux: hatget-1-1-lnx.tar.gz
Getting the server to work with Microsoft's Telnet client that ships with Windows (or doesn't, as is currently the case), proved to be a bit of a pain. In Linux I could connect to the server, type a command, and as I typed I would be able to see the letters appearing in my local terminal. When I hit enter, the server would receive the whole line I had typed. All good.
In Windows, however, the first problem I discovered was that the telnet client is no longer installed by default for Vista onwards...
]]>Getting the server to work with Microsoft's Telnet client that ships with Windows (or doesn't, as is currently the case), proved to be a bit of a pain. In Linux I could connect to the server, type a command, and as I typed I would be able to see the letters appearing in my local terminal. When I hit enter, the server would receive the whole line I had typed. All good.
In Windows, however, the first problem I discovered was that the telnet client is no longer installed by default for Vista onwards. Vista / 7 / 8 users have to follow this guide to enable it.
The next oddity I found was that telnet would begin echoing characters locally, and then stop, leaving me typing blind. I did some Googling to find the list of telnet options in an attempt to work out whether there was some negotiation the server was supposed to make with the client in order to get it to echo properly.
Telnet's option code 1 is "echo", but this refers to remote echoing. That is, whether or not the machine should send back the characters it receives from the other end of the connection. I wondered whether the server needed to explicitly declare that it wasn't going to do any remote echoing:
IAC WONT echoBut this didn't appear to make any difference.
Then I discovered that the telnet client has its own local echo setting that can be turned on and off:
telnet> set localecho onHowever, this still didn't explain why local echoing worked initially but stopped working after a moment. More Googling eventually led me to this forum thread, where it was revealed that Microsoft Telnet does some weird mode-switching based on what it receives from the server. This behaviour can be summarised as follows:
- By default, the local echo option is set to off
- However, this option is overridden when telnet first starts, and it will begin echoing characters locally anyway
- Telnet switches out of this initial overriding mode as soon as it receives its first command code from the server
- It then respects the local echo option, ceasing to echo characters locally until the user turns the option on.
In my case, I had been sending the "are you there" command periodically in order to check the connection status. Windows telnet was stopping its local echo as soon as one of these arrived. For my particular situation, the best solution was simply to stop sending any commands to client at all. This was the simplest way to guarantee that the client would echo locally by default.
Finally the last hurdle I encountered was the different way Microsoft telnet was handling typing. In Linux, the client buffered the message locally as the user typed and only sent it once enter as pressed. In Windows, each character was being sent to the server as soon as it was typed. This even included backspace as the user edited their message. My solution was to buffer the input on the server, making sure to remove the previous character on receipt of a backspace code.
]]>What's happened with it since then? Well...
]]>What's happened with it since then? Well, I've been slowly chipping away at the gameplay prototype; adding elements, removing them again, expanding, refining and tweaking things. Arguably I don't actually have a clue what I'm doing, but hopefully my gut feeling about what's fun and what isn't has helped it improve.
I'm now at the point where I'm fairly happy with how it plays, and I'm finally ready to start coding up the game proper. I'm going to use PyOpenGL to do a basic hardware-rendered 2D engine in Python. For the graphics, I'm going to aim for a cartoony look using vector art which I'll export from Inkscape to high-res textures.
Here's a gameplay video of the prototype:
]]>